In this Diary, I plot a journey, during which I hope to learn how middle Bronze Age pottery found in the South West of England (known as Trevisker ware) was made..... then try and do it myself. This opportunity was sparked by being asked to make a replica pot for an exhibition at the DNPA's High Moorland Visitor Centre in July 2010, but I have a feeling this journey will be much, much longer than that.....
(The entries in this Diary are ordered so that the latest is at the top. Scroll down and start at the bottom if you would like to read previous entries in chronological order).
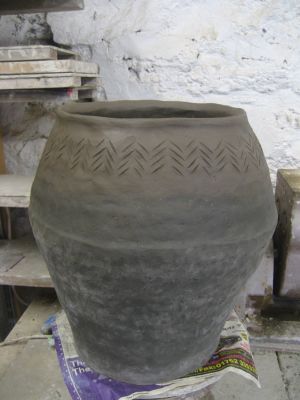
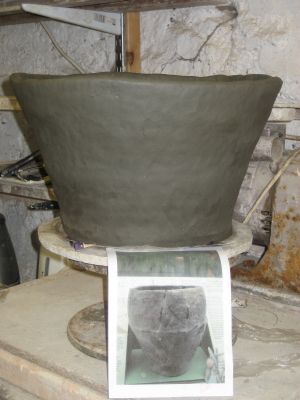
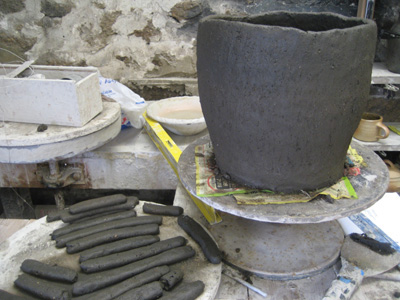
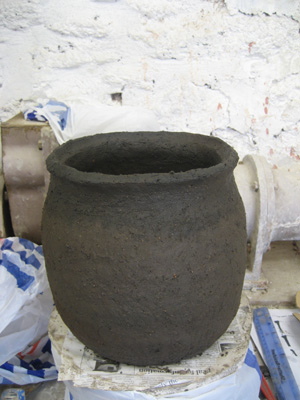
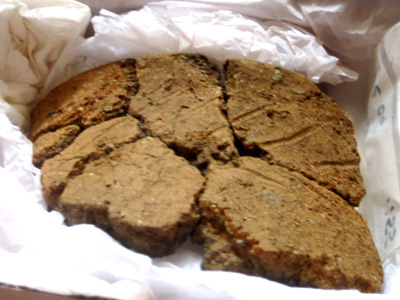
27th September - the made pot
And so, the replica of the Holworthy pot has been made, but not yet fired. I have used the pot on display in Barnstaple museum as a guide to the shape, including the ridge half way up the pot. The base of the pot found at Holworthy gave me an idea of the dimensions of the original, and have attempted to mimic the herringbone patterning that we saw on the Holworthy sherds.
It will need to dry out completely before I attempt to fire the clay to ceramic. In the image alongside you can see that the base of the pot it drying ahead of the newly-made rim, which give a risk of cracking as it continues to dry, but it was necessary to support the height of the growing pot as coils were added. Now I must wait for the drying to finish before attempting to fire it without reducing it to a jigsaw!
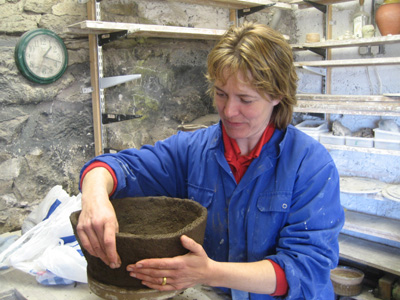
27th September 2012 - decorating the pot
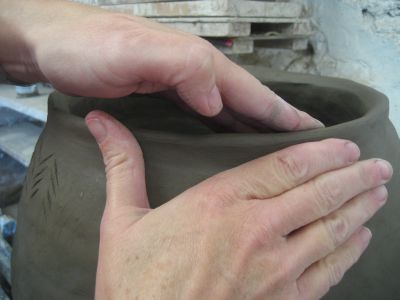
Once the pot had grown to its full height and shape, the next task was to complete the decoration on its surface.
The first step was to slightly shape the rim to mimic one of the sherds I had seen in Barnstaple museum (see the image in 18th November 2011 entry). The sherd had shown only a subtle shaping, and I had to be careful not to over-emphasise it.
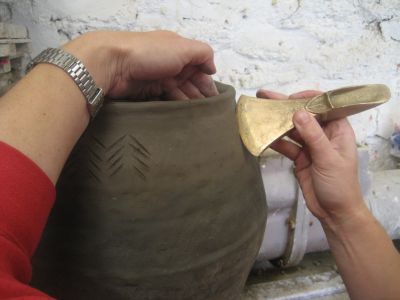
The second task was to find a tool which, when pressed into the clay, made a mark similar to that seen on the sherds of pot found at Holworthy. When examining the originals in the museum Rob and I concluded that a rounded, bevelled edge had been used - perhaps an axe head?
Faye posted me a replica axe-head, so I tried pressing this into the clay. The resulting marks showed that this axe head was correct in its curve, but the bevelling was too sharp. Perhaps the axe-head that had been lying around in the hut when the bronze age maker of the original pot had been decorating it, was blunt!
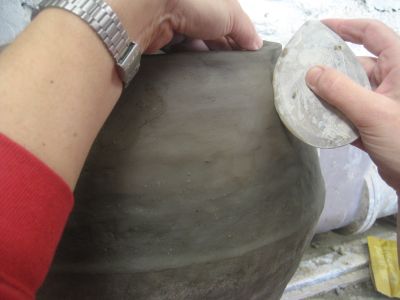
To mimic a more blunt axe-head, I tried a wooden tool that I have in the workshop which I usually use when throwing bowls on the potters' wheel. It had a similar curve to the axe-head, but, because it was wooden and well used, it was more blunt.
The resulting mark was a close match to the original, so I continued working around the pot to make a herringbone pattern with the tool. The Holworthy pot was only decorated for a few inches under the rim, so I decided to do the same.
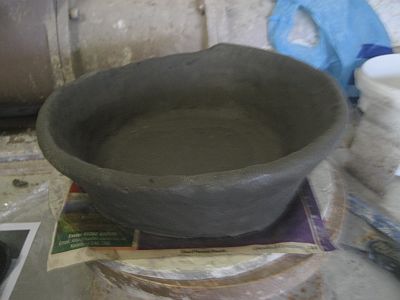
September 2012 - making the pot
Using the clay with the river gravel kneaded in, the pot was begun by pressing out a flat disc of clay to form the base. I checked my notes for the measurements I had made of the original Holworthy pot base (scroll down for details) and added on about ten per cent for shrinkage in the drying and firing process.
The sides of the pot were made by rolling long sausages of clay that were about as thick as the walls of the original pot, adding them to the perimeter of the base, then on top of each other to gain height.
As the pot grew, I had to stop and wait every five or so coils for the clay to dry. Once the new section of wall had strengthened it could take the weight of the next section to be added. Whenever I stopped I checked the shape of the replica against the image of the pot displayed in Barnstaple museum.
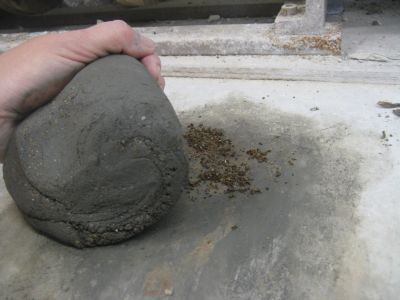
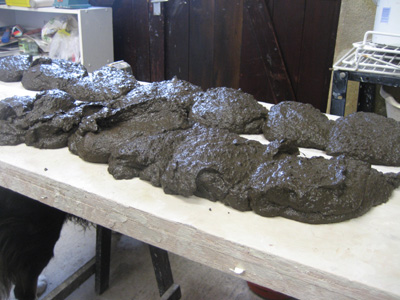
August 2012 - preparing the clay
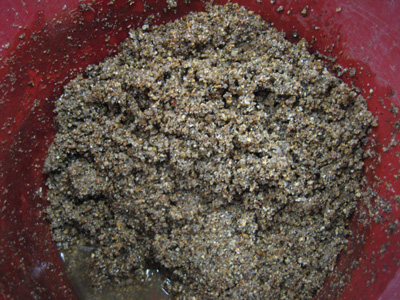
Having chosen the clay and gravel from which to make the replica pot, the next step was to mix the two together. The clay had been gathered by Rob and Faye and was in a perfect plasticine state of dryness, so it simply remained for me to combine it with the river gravel. I did this by kneading the clay over a sprinkling of the gravel.
23rd March 2012 - selecting materials
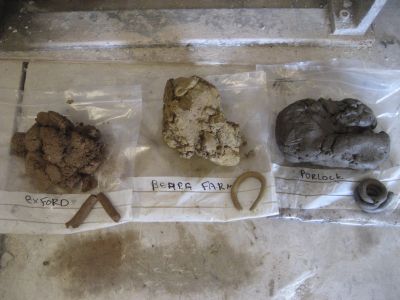
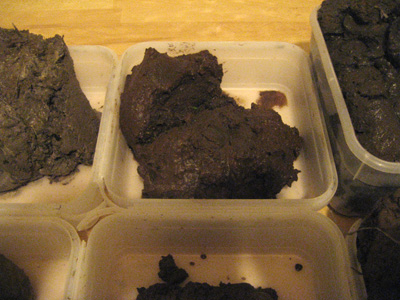
The first step in the project to make a replica of the Holworthy pot, is to find a clay and river gravel to make it with. Earlier this month Faye sent me some samples of three clays and two river gravels that had been dug from Exmoor, in the hope that I could find something suitable.
First, I tested the three clay samples to see if any of them were 'plastic', i.e. that it has the unique characteristic of clay - the ability to bend without breaking. It is this plasticity which sets clays apart from mere mud.
The test is very simple: roll out a thin sausage and bend the sausage round into a U-shape. If it can do this without cracking or breaking, it is a plastic clay. The photo alongside shows what each of the clays did when tested this way: as you can see, the clay from Porlock is the most plastic by far, as it will turn in a tight spiral without cracking. What a fabulous clay!
The colour of the clay is not important when choosing one. Although they look very different when they come out of the ground, all three would fire to be about the same earthenware colour when they have been fired. ( cont'd) ...
I then looked at the particle size of the river gravels, and decided that the one most similar to the gravel in the clay of the original Holworthy pot was the Landacre one. The river gravel on Exmoor reflects the shale geology of that area - it is made up of flat platelets.
Once I let Faye know my favourites, she told me that the Porlock clay was estuarine. That made me smile for two reasons. Firstly, that I had slid around the Teign estuary searching for a good estuarine clay when making the Dartmoor pot, and this clay, which had landed by post, was so much more plastic than any clay I had found. Secondly, earthenware clays found on the North Devon coast - such as the one quarried at Fremington for the now defunct Branhams pottery - are famous for their plastic qualities. That made me feel that good choices had been made, and it looks like the problem of materials has now been solved.
18th November 2011 - A New Dawn
When I delivered the replica Trevisker pot to the High Moorland Visitors Centre in June 2010, I kinda knew that it wasn't the end of my working with bronze age pots and making methods. It had been a special experience for me, and it felt as though I was only at the beginning of a long personal journey. Making replicas isn't my focus as a potter, but making that replica had influenced the way I think about the pots I make and it felt good to be involved. And earlier this year, another opportunity came my way....
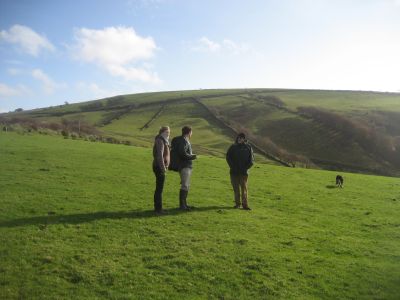
During the summer I was approached by Faye Balmond and Rob Wilson, archaeologists at Exmoor National Park: they knew I had made a replica bronze age pot for Dartmoor National Park and Exeter's Royal Albert Museum in 2010, and Exmoor was considering commisioning a replica for a project of their own. As a follow-up to those discussions, I took a trip to Exmoor today, and met Faye, Rob and Terry Green at Holworthy Farm on the western edge of the moor. Terry was the chair of the North Devon Archaeological Society in 2003, and oversaw the excavation of a Hillslope Enclosure at the farm by a team of the society's members. They found the remains of a Trevisker ware pot in a round building (probably a domestic hut) in the enclosure. This excavation was to include a lot of firsts - the first hillslope enclosure to be excavated on Exmoor, and the first to find carbon-dated evidence of grain cultivation on Exmoor in the middle bronze age being amongst them - not bad for a band of volunteers.
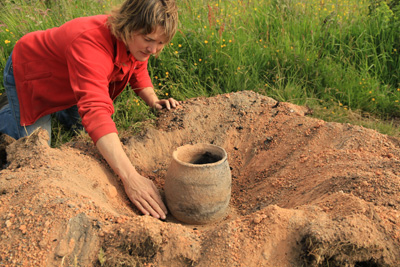
Having popped into the farmhouse to say hello to the farmer's family, the four of us headed up to a field on one side of a green valley on the farm's land. On entering, all I could see was a field of grass: wonderful grazing, but any significant archaeological site was lost on me. Over the next half an hour or so, the knowledgeable three pointed out what mysteries the field held.
Firstly, a man-made banked shape in the ground, where a round plateaued area had been built. This round bank had had stones piled on top to form an enclosure. At the top of this hillslope enclosure, inside the perimeter, post holes had been found where a round building had stood. It was inside that building that a complete base of a Trevisker ware pot was found.
Rob also pointed out that dotted along the skyline of the valley were a number of barrows. In fact, there are so many in the locality, he described it as Barrow World (which, having passed tourist signs pointing to Barometer World on my journey to Exmoor, seemed apt). Other settlements contemporary with this one at Holworthy were just over the ridge.
Finds at the excavation had been carbon-dated and showed that the settlement was inhabited in the middle Bronze Age - as was the pot - and had been re-used in the Iron Age.
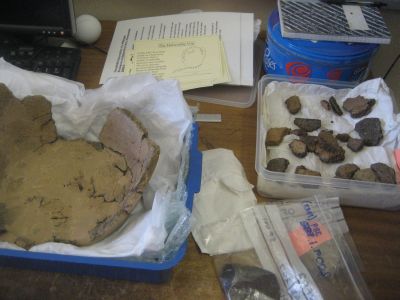
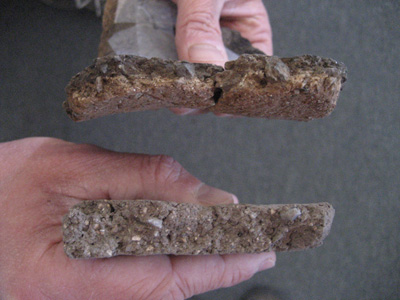
The next part of our day centred on a visit to the Barnstaple museum, as this is where the pieces of the Holworthy Pot are kept.
It was so exciting to be back, touching and musing on parts of a pot made 3000 years ago. in the Dartmoor project I had had parts of a rim to work with, this time in Exmoor, there was a base with countless sherds from the top half of the pot.
I was struck by similarities in appearance to the Teignworthy sherds: the colour of the clay, the thickness of the pot's walls, the size of the pot and the decoration. We estimated the pot base to have an internal diameter of 8", and the whole pot to have had a height around 14". I was immediately filled with familiar trepidation at the thought of bon-firing such a large pot successfully.
We closely inspected the base (even turning it over!)...
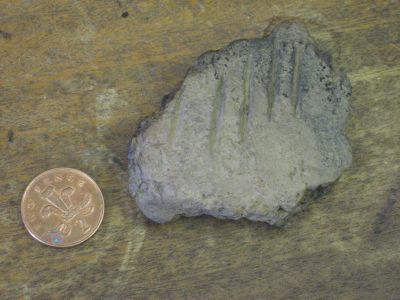
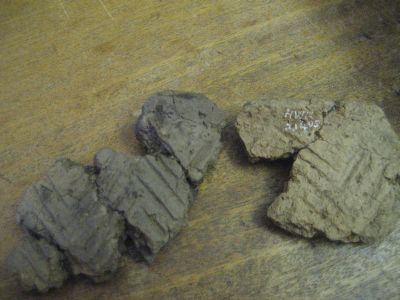
We looked at sherds of the top section of the pot that exhibited external decoration. It seems there were pieces of two pots: one had simple diagonal slashes as decoration...
... The other had an impressive pattern of similar marks but arranged into an intricate herringbone pattern and perhaps a horizontal band. It was a joy to see this decoration 'in the flesh' as I had only seen it in diagrams before.
We mused how the lines had been made. Having decorated the Dartmoor pot by scorring, I now wondered if the marks were pressed in. Looking at the shape of the individual lines, Rob wondered if the tool had been curved and slightly tapered at the edge.
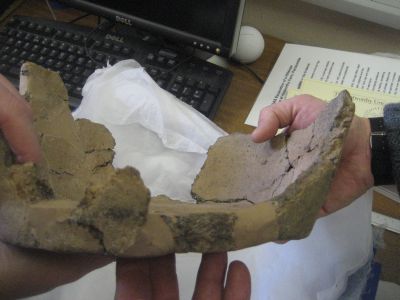
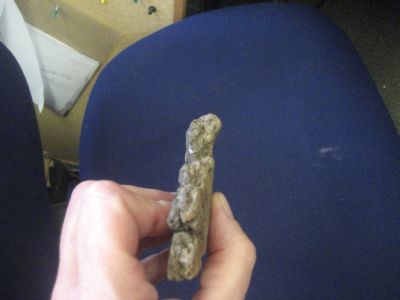
I had a look at pieces of rim, to see it's shape and profile, marvelling at how you can see where the clay edge has been moulded against the shape of the makers fingers all those millenia ago. Looking at evidence of a man/woman making a useful thing out of clay 3000 years ago, just as I do now, is a humbling reminder that our time is very fleeting indeed...
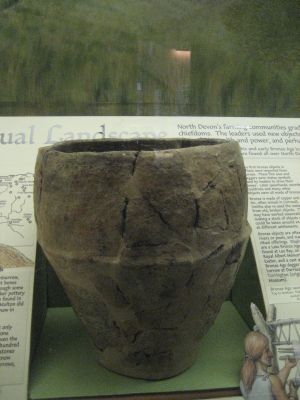
Lastly, as if there had not been enough excitement for one day, Rob and Faye then took me to a pot on display in the museum: a bronze age pot which had been found in north Devon ... ... complete. It is now on display as reconstructed pieces of pot because, jawdroppingly, years ago a museum employee had dropped it!
It was such a joy to see the complete shape and dimensions of such a pot.
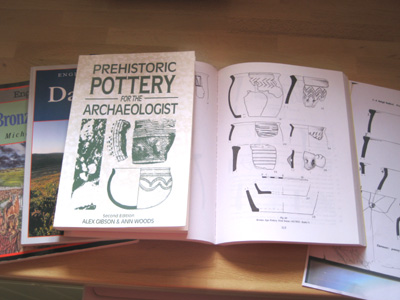
And so the Trevisker project at Powdermills has been shaken out of an eighteen month sleep. The next step in this journey is to read the detail of Terry Green's excavation report, and the report written and published by the South West's archaeological expert, Henrietta Quinell.
In this second making of a replica, I hope to bring a few things with me from the Dartmoor project: I would like to improve the shape of the finished pot to bring it closer to the Trevisker ware form; and I would like to spend significant time finding a clay source local to Holworthy which is suitably plastic for the job of making the replica. I would also like to learn more about the contemporary bronze-making methods to see if any could be transfered to the firing of the pot. Here goes...!
30th September 2010
The Going for Bronze exhibition, including the replica pot made by Joss at Powdermills, has been given a new home. Until 2012, you can see it at the DNPA Information Centre, Postbridge.
The Teigncombe sherds, replica pot and the film are all part of the Going for Bronze exhibition. I hope you get a chance to go and visit. The exhibition puts the pot in the larger context of 'Life, Death and Landscape on Dartmoor in the Bronze Age'. The Bronze Age era is so close to Dartmoor's heart, it is an apt and fitting exhibition for the Royal Albert Memorial Museum and the Dartmoor National Park Authority to produce in Princetown.
Going for Bronze 3rd July - 29th September 2010 DNPA Information Centre Princetown
The beginning of the exhibition marks an end of the first chapter, but the next episode of this saga never feels far away. I will be handing fragments of the clay used to make the replicas to Roger Taylor (Geologist) for scrutiny: I am hoping he can shed some light on similarities and differences to the clay used in the making of the original Teigncombe sherds. Henrietta Quinnell (Archaeologist) will be examining the pots made thus far, and I am hoping we will be able to discuss improvements on replicating shape and decoration, and chat further about theories regarding how they were used. I would like the chance to see more sherds of Trevisker cooking pots: looking at bits from a base, for example, would help answer questions I now have about how they were made. I will, of course, continue to report all outcomes through these Diary pages....
15th June 2010
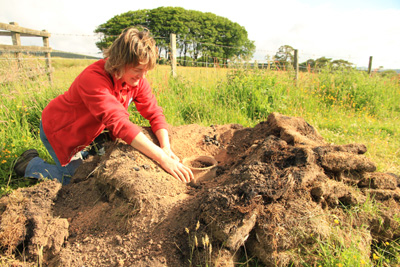
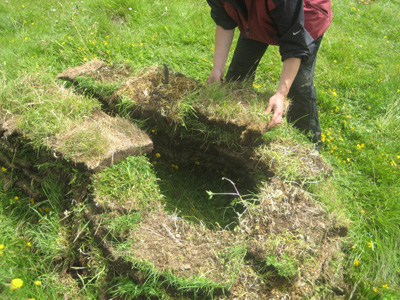
Well, this was it. The Dartmoor National Park film crew had arranged to be at Powdermills early doors, camera poised, ready to film the last scene of the exhibition video. The only thing we didn't know was whether the story was going to be a tragedy or a feel-good movie. The moment of truth had arrived - was there a pot in the mound of turf, or a jigsaw? We all agreed it would be best to film the unveiling without sound (!) and add suitable music later.
The collapsed turf 'kiln' had sat cooling for four days, and once I started delving in, it became clear that the turf had kept burning on the inside, and had dried to a crumbly, sand-like texture. It was like digging on the beach. Soon, I unearthed part of a rim. I felt like an archaeologist catching a first glimpse of a possible artefact. But, was the rim complete?.... Was it attached to a pot? .... Was the pot it was attached to cracked? Deeper excavation revealed the rim was indeed complete, and attached to something. Further unearthing, and I finally allowed myself to hope that we had a complete pot.
Yes, we have a pot. The rim has been damaged, no doubt by the turf falling in during the early stages of cooling, but I can live with that.
The pot I fired was the first of the two pots I made, which, you may remember is not the best of shapes. Now that the pressure is off (the exhibition for which the pot had to be completed begins in a fortnight!) I can enjoy firing the second pot, which has a shape closer to that of a Trevisker cooking pot.
Meeting the deadline to produce a pot for the exhibition in Princetown has brought the first episode of my Bronze Age investigations to a close. However, I feel this is far from the end: I would like Roger to take a look at the Teign estuary clay now that it has been fired, and tell me how close it is to the clay used to make the original 3,500 year old sherd; Henrietta has shown me how to further improve the form, size and decoration of future replicas; plus, there is a puzzle to be solved - making the pot is one thing, but how did our Bronze Age ancestors cook with such a pot, given that it can not be placed over or in a fire without risk of cracking? But, for now, there will have to be a pause in my bronze age investigations. The visitor numbers to the pottery are steadily increasing as we reach the summer months, and my attention must turn elsewhere for the time being.
So, a happy day. An end of one journey in pot-making, but one that leads to so many other questions to answer.
Meanwhile, I'm off to the Warren House Inn for a large, celebratory gin.....
Disaster! I toddled out in my pyjamas this morning to the turf mount, and froze on the spot. The lid on the turf collar has collapsed in. Why I didn't think of that, I really don't know: the lid was heavy, and it would have been thinned by the smouldering heat inside over night. It is now looking unlikely that the pot inside will be in one piece.
The danger to the pot from this collapse is two-fold. Firstly, if the pot managed to stay in one piece throughout the firing, it would only have reached a low temperature in pottery terms.... it is therefore fragile. I didn't see how the turf collapsed, but if it fell heavily, then it is unlikely that the pot would have survived. Secondly, even if the turf fell gently and considerately, if the collapse has allowed air to get it and touch the cooling pot, then it will have popped.
So, I continued my morning task of covering the turf mound with tarpaulin (we are forecast some rare winds and rain today), but I've lost the skip in my step as I retreated back to the cottage...
9th June 2010
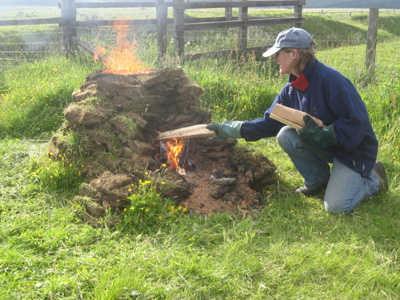
It's just got dark, and I have come in through the back door, followed by the distinctive waft of wood smoke emanating from my hair and clothes, and wearing the sooty face-paint of a potter who has just finished a wood-firing. Today, I fired the turf kiln and the first of the replica pots I made.
I am quietly impressed with the turf 'collar' in which the pot was fired. It held up to fire burning within it for ten hours, and although it thinned and I wondered if it might weaken and cave in, it maintained its strength right to the end.
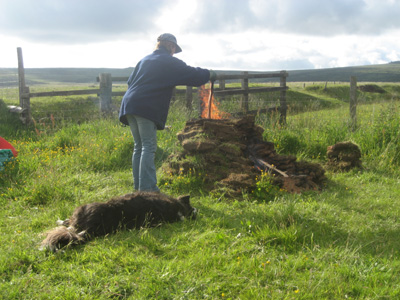
The firing began with wood being stoked into the firebox alongside the pot-chamber (see last entry for more explanation of the kiln structure), and, as hoped, heat was drawn from the firebox, past the pot and up through the opening at the top. Much effort was made to ensure flame did not touch the pot too early. The fire was then gradually pushed along the firebox towards the pot, until it was in the chamber alongside it. Once the fire in the pot-chamber was well established, I took the firebox away and stoked wood directly next to the pot. Finally, the hole on the side of the collar was blocked up, and I stoked down on to the pot from above. In all, the firing took ten hours, although I may well have been able to do it in less.... (cont'd)..
I have no idea what temperature the fire reached, as I had no measuring device. I did place a couple of Cones alongside the pot, which may tell me if it exceeded 855c or 1000c when I unpack the cooled 'kiln'. Whilst firing, I had to rely of looking at the colour of the flame to decide if I had reached the desired temperature of around 900-1000c. I think I did...... we'll see.
I also have no idea if the pot has cracked, or if it has blown into hundreds of pieces. It soon disappeared under flames, embers, wood and heat .... not to be seen again until all has cooled and the unwrapping begins.
At the end of the firing, I placed a turf 'lid' on the collar. I plugged up any gaps I could see in the turf structure, as any cold air getting in whilst the pot cools could .... yes, you guessed it... crack the pot. The turf mound smoked heartily for about half an hour once it had all been closed down.
And now the waiting game begins. If the pot finished the firing in one piece, it still has to cool evenly and slowly in order to remain in one piece. I am going to walk away now for 36 hours, then see if it all feels cool enough to peek inside. The last scene of the Dartmoor National Park video following the making of the pot will be either the completed pot .... or a wailing potter. Watch this space.
8th June 2010
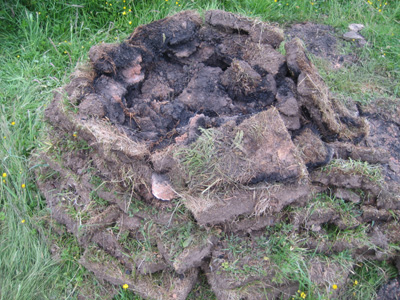
There are very few things on this earth that manage to make me feel childishly excited.... but fire, and building places to put pots and fire in, is definitely one of them. It's a kind of legitimate pyromania, I suppose. Today, I built the turf 'kiln' in which I hope to fire the replica pot. I allowed myself three days of frustrating trial and error - and found it was done in an hour!
I have no handed-down advice from Bronze Age generations to guide me on how it is best done, and there is very little archaeological evidence on which to build theories. So, I can only use the knowledge I have from my own experience of firing wood-fuelled kilns. I therefore considered that I wanted to build a turf collar to protect the bonfire in which the pot is to be fired, to decrease the whimsy of wind and drizzle (this is Dartmoor, after all). I knew that the flame from the fire could not touch the pot itself until the space around it had reached a temperature of 600c, or the pot would crack. So, as you can see from the photo, I build a key-hole shaped igloo. The stalk of the keyhole is where the fire will be lit, away from, but heating the pot which will be placed in the round area. Once the fire is hot enough it can be pushed up the stalk into the pot-chamber with no danger.
When building the collar upwards, I corbelled the turfs in slightly, creating a very gradual igloo shape. A bit of Googling had told me that corbelling was something Bronze Age man knew about (albeit up in Scotland - I have allowed my to assume that word got down here).
A turf-nerd could get excited about over-engineering this pile of turfs to his hearts content. The turfs were a joy to build with, because they could be cut to shape with a knife so very easily. If so inclined, you could cut perfect sections to form a circle, and achieve a perfect dome - not my cup of tea as you can see.
In the second photo, you can see the finished kiln, with the firebox on the right, and the pot-dome on the left. When I looked down the firebox into the chamber I was impressed to see how the space where the pot will stand was so calm, protected from the prevailing winds.
The ultimate test was to light a fire in the firebox, and see if the smoke would draw from the firebox, through the pot-space and up the hole at the top of the dome. Draft is essential if even a low temperature is to be reached. Much to my finger-tingling delight, smoke immediatly started to puff ffrom the 'chimney', and the fire was drawn through instantly (see below).
Roll on tomorrow - firing day!
25th May 2010
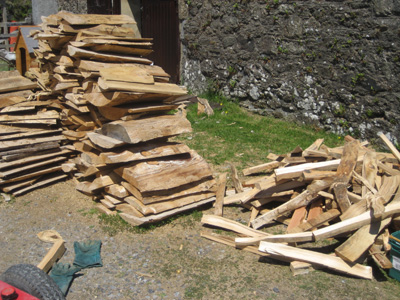
Today I felt I had stretched a hand across three thousand years, and touched the Maker whose pot I am trying to copy. In the last few days I have been preparing for the firing of the replica pot, and undertaking familiar tasks which are all part of my pot-making routine at Powdermills: sourcing wood; cutting it and splitting it to size; stacking it near the firing site so that it is at hand when needed; worrying if I can keep it dry enough; fretting over whether it is seasoned enough and will burn well. As I did all this, I refelcted on how this must have been exactly what went through the mind of the original maker all those millenia ago,as he/she prepared for a pot-firing. Some things, contemporary and ancient, remain the same, and I felt a timeless, mutual understanding.
Tomorrow, I hope to complete the task of carrying two tonnes of newly-split wood from the yard at the front of the pottery, up to the top of the bank behind, where the turf kiln will be. I have no idea how much wood a firing will need, but I do know that I will probably have to do it three times, so the more wood the better. Being surrounded by beef farmers up here on Dartmoor, I am often the butt of many jibes about vegetarians being weaklings.... given the tonnage of wood I shift, I'd be happy to arm-wrestle any of them, anytime....!
22nd May 2010
Second version of the replica Trevisker cooking pot completed....
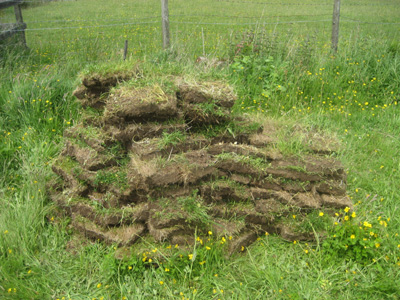
The turf has now been cut (see Blog to see Sam cutting the turf), and this week I shall build the turf-enclosed bonfire area. I can then fre the first version of the pot, which will be an important lesson in how to control the firing and how the clay stands up to being fired this way.
19th May 2010
During the past week, progress has been made making the second replica pot, taking note of Henrietta's comments (see last entry) and trying to improve on the shape . The first pot I made will be my guinea-pig for the first bon-firing. So, while it sits in my kitchen, snuggled up to the Rayburn to dry, I have been researching how it is thought these pots were fired.
As ever, we do not really know - little evidence of the structures used have been found. It is felt that pots may have been clamp-fired, pit-fired or bon-fired during the Bronze Age period. The original sherd of bronze age cooking pot that I have been working with, is quite pale and 'oxidised' in colour: it is therefore felt that it was probably not clamp-fired, as, when fired this way, the pots are fired in a sealed space with limited oxygen giving a 'reduced', darker pot.
As well as reading the archaeological tomes passed to me by Henrietta describing theories on the probable bon-firing methods, I have been researching the work of other potters who have also experimented with replicating Bronze Age firing methods. I am particularly indebted to two potters - Bill Crumbleholme and Andrew Appleby - who have very generously shared their experiences on their websites. You can take a look yourself, by clicking on the links below.
I shall report on the progress of firing preparations over the next few days....
I am relieved to report that the second clay chosen from the many Teignmouth estuarine samples, is proving more plastic and a little easier to work with than the first. A few days ago I managed to complete a pot using it. I have been in discussion with Henrietta about the shape of the pot, and I have copied her feedback below. Although this pot is incorrrect in many ways, it is a huge step forward for me - I have identified the clay I am going to work with (it was looking a bit dodgy there for a minute), and I now have a bit of extra bounce in my step.
Henrietta said: ".... The main problem with your vessel is the constriction at the neck which is far too deep. The vessel would be much straighter sided with out the neck and shoulder effect...... The detail of the rim form looks OK. The base angle would normally be fairly sharp..."
So, with renewed vigour, I shall be making the next versions and, with Henrietta's guidance, hope to get closer to the correct shape for a middle bronze age cooking pot. I can then complete the vessel by copying the scratched decoration that is seen on the sherd found at Teigncombe.
Meanwhile, ever aware that it is the next stage of the making process - the firing - that is going to be far and away the most difficult, I am going to use this first version as a guinea pig, and put it in a bonfire. That bronze age man managed to successfully heat a pot made of this type of clay without it cracking into tens of sherds, is a constant source of admiration for me. As clay heats, it shrinks. If different parts of the pot are heated at different rates, and are therefore shrinking at different speeds, the pot cracks. This seems most likely when heating the pot in a bonfire, or pit. There are clays which resist 'thermal shock', but I don't think Teign estuarine clay is one of them!
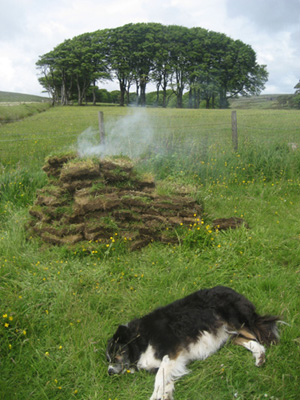
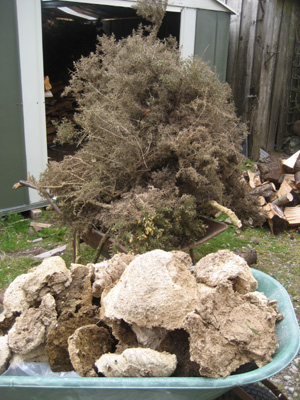
As you can see from the photo below, I have started collecting anything I see (in this case, dead gorse and dry cow poo) which may act as a good fuel for slow and quick burning stages of the firing..
5th May 2010
Well, I can now report that my instincts about the clays I have collected in order make my replica Bronze Age cooking pot were spot-on. One of the two clays that I am working with is indeed not plastic enough for pot-making (see 30th March). I doggedly pressed on building a pot with it, worrying all the while that it would not have enough 'dry strength'. This means that as it dries, if you pick the pot up, it simply crumbles. And that's exactly what happened! I haven't got a photo to go with this report - when the pot crumbled, many things went through my mind (some of them I said out loud), but none of them were 'I must get the camera'!
So, I am continuing to work with the second clay, which I believe to be more plastic, and therefore, hopefully, more easy to work with....
22nd April 2010
Now that the Easter rush in the pottery shop is beginning to subside, and the kids have gone back to school, work has started in earnest: I have begun the first of many attempts at making a replica bronze age pot, using the clays prepared last month.
I am making two pots at the moment, one from each of the two preferred clay samples from the Teign estuary. Henrietta gave me a diagram of the shape of the pot, and some idea of the dimensions. It's a daunting task, as making this replica requires completely different skills to those I use in my normal pot-making: I usually throw my pots on the wheel, but Henrietta has told me that Bronze Age pots were built using flattened coils, and I aim to build the pot the same way. So, I am rolling the clay into round sausages, flattening them into a more rectangular shape, and fixing them on the rim of the growing pot. Apparently, the coils were overlapped and melded together one on top of the other. And so the pot slowly grows. After the pot has grown up about two inches, I have to pause and allow the clay to dry to a less floppy state, so that the walls can support the weight of more coils being put on top.
While I am waiting, I stop and look at the five original 3000yr old pieces of pot, and I am humbled by the craftsmanship: the wall thickness is even, the rim is level and beautifully shaped. There is nothing primitive about the way this pot was made, and I am aware that my own craft skills are nowhere near as honed as the original maker's.
I am finding that the clay I usually use at Powdermills is very 'plastic', but the two estuarine clays I am using for the replica are very unforgiving, not allowing me to bend it and stretch it easily when shaping the pot. However, I'm pretty sure the clay is fairly true to the original: if you look at the orignal pot sherds, and the clay I've made for this project, you can see that, taking into account the change in colour that will occur when it is fired, it's pretty close.
Because of the amount of river gravel held in the clay (about 25%), the surface is very rough and textured. However, the surface of the original sherds appear more smooth. Roger told me at our meeting that the surface of the original pot sherds were probably smoothed using water, but it was not polished or burnished to any great extent, so that's what I shall try and mimic.
And so the pot-making has begun, and progress is slowly being made. As I am working, I am being very careful to do my best by the original craft-maker. At the same time, I am also aware that the first pots I make I fully expect to crack when I fire them, as they are to be fired in a bonfire. As I make the first replicas, I plan to discuss improvements in the authenticity of the shape with Henrietta, then start experimenting with bonfire-firing them. As I progress, hopefully the replicas will improve, and I will start to succeed in getting them out of the bonfire whole! Actually, just one before the exhibition starts would be a relief.... Here's hoping......!
30th March 2010
This week, having satisfied myself that I had a good stock of my usual pots ready on the shelves at Powdermills, and all was prepared for the beginning of the cream tea season, I could turn my full attention back to the making of a replica Trevisker ware pot.
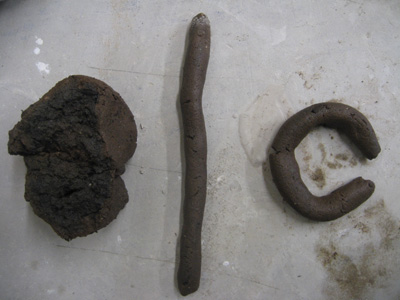
The first thing to do was to test the many samples of clay I collected from the Teign estuary, to see if they were indeed clay. Clay has special qualities that sets it apart from mud - primarily, that it is 'plastic', in other words it will bend and stretch as it is moulded, without breaking up. The photo alongside demonstrates how you can test for plasticity. On the left is a sample collected from the Teign river bank which has been allowed to dry from its wet state, to about the same consistency as play dough. This mud-dough is then rolled into a sausage (centre), and bent into a circle (right). If the mud-dough can bend into a circle without breaking.... it's a 'plastic' clay.
If you look closely at the circle in this clay-test, you will see that the clay sausage began to break a bit as it was bent round. I think that this sample collected from the Teign estuary is clay, but isn't particularly plastic. However, it remains my favourite of all of the seven samples collected because...........
.... when dry, this sample of clay has a colour close to that of the original Bronze Age Trevisker cooking pot sherds excavated from the hut circle at Teigncombe. The sample of dry clay on the left of this photo has not been fired, which will change its colour, has never been used to cook in, or been buried in the ground for thousands of years. Taking all of that into account, the colour looks hopeful.
I did collect another sample of clay which proved more plastic in my clay tests, but I think it will have too white a colour once fired, although I feel it will be much easier to work with when making a pot.
At the end of the clay tests, I picked two clay samples to take to the next stage of preparation. I now had to get the chosen clays into the right state to work with when making the replica cooking pot....
... I went back to the Teign estuary, and collected bigger samples of the two chosen clays. I took my dog with me at low tide for a walk along the footpath that runs along the estuary: as I returned towards the car, carrying two buckets of rather fruity-smelling estuarine mud, a fellow dog-walker stopped me and said "Excuse me, I hope you don't mind me asking..... it's just that most ladies carry handbags....."! Yes, thought I, my poor long-suffering mother often thinks the same....
Once back at the workshop, my first task was to take all large stones, leaves, roots and other foreign objects out of the clay.....
..... I then went to the local stream and collected some of the pink-coloured gravel that you will find along any of the water courses on Dartmoor. The gravel is eroded granite, locally known as growen, which is swept downstream when the rivers are in spate, and deposited along the flood plains. I often collect this river gravel, as, when making my usual range of pots, I grind it down and use it to glaze the insides.
In my initial meeting with Roger and Henrietta, Roger told me that the original Bronze Age sherds found at Teigncombe had about 20-25% of this gravel filler added, and the bits were around 3-5mm in size. I picked out the larger bits of gravel, and as I added it to the clay, wondered whether my favourite sample was plastic enough to stick that amount of filler together. Ah well, once I start making a pot with it, I'll soon find out!....
...Lastly, the wet mixture of clays and gravel were slopped onto wooden boards, and left to dry back to the consistency of play-dough. Once dry enough the pot-making will begin!
One thought that occured to me as I went through all of this clay collection and preparation - what did Bronze Age Man do without the use plastic buckets.....?
On 14th April, Henrietta replied: "...leather buckets/bags would have been the prehistoric equivalent to plastic buckets tho it is probable that stave-built buckets were coming in during the Trevisker period."
1st March 2010
In case you're wondering, there will be a little pause in the progress of this project until about 15th March. I am having to concentrate on firing my usual range of pots, so that I have some stock to sell from Easter at the pottery (see Joss' Blog). From mid-March, the Trevisker project will get all of my attention, as the Bronze Age exhibition will be getting very close.....
First Clay Samples Collected - 16th February 2010
I spent the day mud-larking at low-tide on the Teign estuary today, searching for samples of clays I could reach and collect without actually sinking into the exposed river bed. It's certainly a sticky, muddy estuary, but I will have to do some work before I can be certain that the samples are indeed clay. The samples are very dark in colour, and some will require the removal of roots, vegetation at different stages of decay, and larger stones before I can test whether they are plastic enough for pot-making.
Just upstream from the estuary is a landscape utterly given over to the quarrying of clay. Dotted everywhere along footpaths by the Teign riverbanks are information boards telling you the history of nineteenth century clay quarrying and export, and it's impact on the landscape. And, of course, on a more vast scale, massive clay pits are still being worked today over acres and acres of ground. Back in the mists of geological time, it is thought that this Bovey Basin once housed a lake, collecting water from moorland rivers. This stilling of the flow of the water allowed the deposit of huge quantities of clay. Given that the Teign flows through all this, I feel it would be peculiar if the estuarine samples I've collected a little further downstream didn't have some sort of clay content.
For comparison purposes, I will collect samples of this 'upstream' clay another day, to include in the material testing phase of this project. Even though Roger has explained that this clay will not have the smooth quartz within it, I can't help myself, as it is these upstream clays that I use myself at Powdermills and I find the familiarity comforting!
I thought it may be useful to include a direct quote from e-mails received from Henrietta and Roger today, explaining the clays used in Teigncombe pots:-
From Henrietta: " ....Most of the Teigncombe vessels have clays which ultimately derive from the granite. However there are two broad types. The type we describe as granitic derived is the sort of clay which would have been dropped as a river from the Moor reached a valley floor. This does not contain rounded quartz. The second type has fewer and smaller inclusions from the granite but does include rounded quartz. This second type comes from estuarine situations. Both types get mixed with granite temper, or temper from other igneous rocks. Both types have also been mixed with gabbroic clay which appears to have come up from Cornwall."
From Roger: "The WBB people were quite correct in saying that the low-lying ground between Teigngrace and Bovey Tracey, known to geologists as the Bovey Basin, was formerly a lake. Or more correctly an area through which a river (the ancient River Bovey) meandered leaving clay deposits in times of flood, lignite deposits from plants growing in dryer times and spreads of sand and gravel directly deposited by the river itself. These deposits are some 50 million years old and over a kilometre thick, they were laid down in a sub-tropical environment. The climate was very different then. The North Atlantic was only just coming into existence as the continents moved apart. ...The ball clays are kaolinitic clays derived from the tropical weathering of the slate and shale around the basin and not from the Dartmoor Granite. The difference between the kaolinite china clay of the granite and the plastic ball clay is the difference in the microscopic crystallinity of the kaolin. The ball clays fire white in an oxidising atmosphere because of their very low iron content. …..Pale firing prehistoric pottery seems to be quite rare in the southwest; I have only seen a few sherds over a number of years working in this field... ...The Bovey Basin deposits were subsequently sealed by a considerable thickness of river gravel and were not worked until about 1730. This makes it unlikely that the clays from the basin contributed to the alluvial clay deposits of the Teign estuary, except possibly for more recent additions since the ball clays were worked".
Finding Clay - 15th February 2010
The first task I face in creating a pseudo-prehistoric pot in the likeness of the shards found at Teigncombe, is to find a similar clay source. Tomorrow is the first day of my search.
Roger Taylor has analysed the petrology of the pot shards found at Teigncombe, and he believes the pot was made from two materials which have been mixed together: the first is clay, the second is a coarse sand or gravel. I must find equivalents of each.
CLAY: Although finding the exact source of clay used by a potter 3,000 years ago would be an impossible task, I would like to find a clay as close to the original as I can. At our meeting last week, Roger gave me some clues as to where I should look. Clue 1: Roger's analysis of the clay shows that there are polished quartz grains within it, which means they have probably been swept by the action of water. So, the first clue for finding a clay source would be to look at a river bed. Clue 2: Roger also told me that having analysed the clay's petrology, I should look at a river local to Dartmoor. This is unusual, as most Middle Bronze Age pot sherds found during archaeological digs on Dartmoor are made with clays dug on the Lizard peninsula of Cornwall. Clue 3: I have also been told that clay is likely to have been deposited where the river slows and meanders, or where it meets tidal waters. So it would be good to look for clay near the river's estuary.
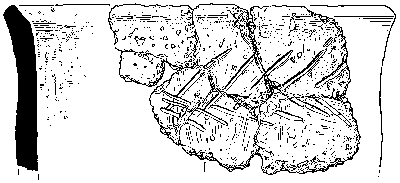
FILLER: Studying the pot sherds has shown that a filler has been added to the clay. In fact, the percentage of filler is so great (25-30%) it would almost be more accurate to say that clay has been added to stick the filler together. You can see from the photo of the sherds, and the archaeological technical drawing of them (copyright DNPA), that the clay is very coarse.
Readers who have watched the video of how I make pots at Powdermills will know that I grind down local river gravel in order to make a glaze for my pots. I was therefore delighted to learn from Roger that it is the same gravel that has been used as the filler, using grains up to about 3-5mm in size. That felt a rather nice connection between two potters' work, spanning the millenia. I am used to finding sources of this gravel, and it too will be found along river banks where the water has dropped it during times of flood.
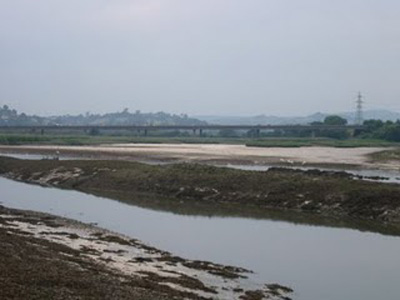
Now, call me an old romantic, but as the hut circle within which our pot sherds were found is at Teigncombe on Dartmoor, I would like to try and source both these materials from the River Teign. The source of the Teign is very local to the pot's final resting place, and the river runs off the moor, then down to meet the sea at Teignmouth. So, given Roger's clues, I'm going to start my hunt for clay along the beds of Teign estuary between Newton Abbot and Teignmouth, then collect river gravel nearer to the river's source on the moor.
Tomorrow I shall start work, searching first for clay. What did we do without the Internet? Tim Berners-Lee changed our lives: add a sprinkle of Google satellite maps, and Ordnance Survey Multimaps, and deciding where to look tomorrow has been so easy. Much to my utter delight, the south edge of the Teign estuary has a footpath running right along it (at low tide) - the Templer Way. This path was named after the Templer family, who built a canal joining their estate at Stover to River Teign and Teignmouth docks to transport quarried clay to port, so there seems to be a poetic reason to start the search here.....
The first meeting - 12th February 2010
Blimey, what a morning. I've got bucket-loads of new information buzzing around in my head, the germs of new ideas forming, and a rising tide of childish excitedness. Today, I started the task of understanding how a cooking pot was made in the South West of England in the middle Bronze Age (1600-1100BC).
A few years ago, an archaeological dig was undertaken of a hut circle at Teigncombe, in the North Eastern quarter of Dartmoor. Pot sherds were found dating from the middle Bronze Age, but these were different to those normally found in such digs on Dartmoor. Analysing the materials used to make the pot, it was thought it was made of locally-found materials, rather than being imported onto the moor or made from clays found on the Lizard penisular of Cornwall, as was quite usual. In conversation with Jane Marchand of the Archaeology department of the DNPA, we thought it would be nice to replicate one of these finds for the Royal Albert Musuem exhibition in July, as the connection to Dartmoor was so strong.
The first step in this journey, therefore, was to find out as much as possible about these pots found at Teigncombe. To that end, I met with Henrietta Quinnell (Archaeologist) and Roger Taylor (Geologist) today. Henrietta has worked as an archaeologist in the South West for decades, and Roger specialises in the petrology of archaeological finds. The knowledge inside the heads of this pair humbles you, and my pen couldn't scribble quick enough when trying to capture the information they spilled, not only about middle Bronze Age pottery in general, but also Teigncombe finds in particular.
We started by looking at sherds found during the Teigncombe dig. The photo alongside shows you a reconstructed part of a cooking pot, currently in my possession and kept way out of the reach of my kids, husband and other animals. Just a mere 3000-3500 years old....
We decided that for the Princetown exhibition, I should not try to closely replicate the pot from which these sherds came, but rather make a pot replicating the typical characteristics of a Trevisker ware pot, incorporating the unusual materials used in this one found at Teigncombe.
I was then introduced to an overview of the nature of the materials used to make the pot and where it is thought they may be found; how it is thought it may have been formed; the typical shape, thickness and size of such a pot; an overview of Trevisker ware decoration; how it is thought it may have been fired. These are the things I must now copy, with much trial and error instead of knowledge and skill passed on by the previous generation, as was probably the case for the pot's original maker. Rather a daunting task in a small number of weeks.
As I tackle each of these stages, I shall update this diary. I'll share the information I started out with from today's meetings, and lessons learned along the way. The next task is to find a suitable clay source. Armed with the information given to me by Roger today, I shall be scouring maps to look for possible clay sites, and trekking out with my shovel. Watch this space.
Next week is half term, so the kids will be off school, and I will not have much time for hands-on activities such as searching for clay. Instead I shall have to settle for taking them to the zoo, settling down on a bench with a coffee and one of Henrietta's books, and try to soak up as much information as I can while they taunt the monkeys through the cage. Or maybe the kids would like to visit an educational Bronze Age villlage, such as Trewortha on Bodmin.....